0
$\begingroup$

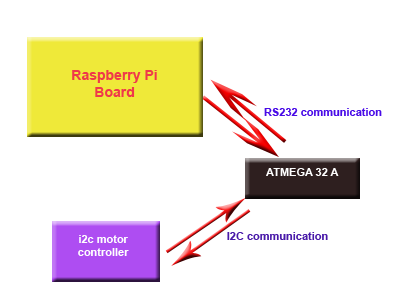
I recently engaged with a university robotics project (based on ROS) and my main processing controller is Raspberry Pi and the system stability controller is Atmega 32 microcontroller (It is responsible for driving motors and check the communication protocols ex:-i2c,rs232 are working in good manner). So the motor controller of this robot is a i2c type one and and it drives the motors according to the i2c signals that coming from the i2c port of the Atmega 32 microcontroller. The main controller communicate with the Atmega 32 using rs232 protocol. So I found an arduino code as below,

// This function is called once when the program starts.
void setup() {
     // Choose a baud rate and configuration. 115200
     // Default is 8-bit with No parity and 1 stop bit
     Serial.begin(115200, SERIAL_8N1);
}

// This function will loop as quickly as possible, forever.
void loop() {
    byte charIn;
    if(Serial.available()){ // A byte has been received
        charIn = Serial.read(); // Read the character in from the master microcontroller
        Serial.write(charIn); // Send the character back to the master microcontroller
    }
}

The communication between processing board and microcontroller as below diagram

communication between processing board and microcontroller

There is an already available arduino library called rosserial for ROS. But I want this in AVR GCC.What I want is convert this code to traditional avr gcc code that work on atmel studio 6
$\endgroup$

2 Answers 2

1
$\begingroup$

I never worked with Arduino, but there is a lot going on behind the scenes in the Arduino Serial class. The examples below should get you started, its not supposed to be compilable or functional as a whole. The example is for UART0.

Serial.begin() performs the low level initialization. If you do this manually it will look something like this:

void UART0_Init(uint32_t baud) {
    uint16_t value = (((uint32_t)F_CPU / (baud * 16UL)) - 1);

    /* Set baud rate */
    UBRR0H = (uint8_t)(value >> 8);
    UBRR0L = (uint8_t)value;

    /* Enable USART receiver and transmitter */
    UCSR0B = (1 << RXEN0) | (1 << TXEN0);

    /* Set frame format: asynchronous, 8data, no parity, 1stop bit */
    UCSR0C = (1 << UCSZ00) | (1 << UCSZ01);

    // enable UART-Receive-Interrupt
    UCSR0B |= (1 << RXCIE0);
}

Then there is the interrupt service routine for the receiver and you would need some state variables to communicate new data to the "main process".

volatile uint8_t lastByteReceived;
volatile bool newDataAvailable;

ISR (USART0_RX_vect) {
    lastByteReceived = UDR0;
    newDataAvailable = true;
}

The Arduino loop() represents more or less the classic while(true){} function in main().

int main(void) {    
    while (1) {
        if (newDataAvailable) {
            newDataAvailable = false;
            // ...write lastByteReceived to a buffer or process it otherwise
        }
    }
}

PS: Isn't there support for syntax highlighting on SE robotics?

$\endgroup$
6
  • $\begingroup$ <!-- language: c--> this annotation is not working? $\endgroup$ Commented Nov 1, 2016 at 9:01
  • $\begingroup$ @BenceKaulics: It doesn't seem so. $\endgroup$
    – Rev
    Commented Nov 1, 2016 at 10:03
  • $\begingroup$ @Rev1.0 This code approximately have essentials parts useful for my purpose . I'll try this asap. $\endgroup$
    – Kaviranga
    Commented Nov 1, 2016 at 10:50
  • $\begingroup$ @kaviranga: Remember to use the related #includes. Here is a reference: nongnu.org/avr-libc/user-manual/modules.html. You probably require at least <avr/interrupt.h> and <avr/io.h>. $\endgroup$
    – Rev
    Commented Nov 1, 2016 at 11:08
  • $\begingroup$ @Rev1.0 Great . I'll keep it in mind! $\endgroup$
    – Kaviranga
    Commented Nov 1, 2016 at 11:14
1
$\begingroup$

Firstly, the Arduino IDE already uses the AVR GCC compiler. Put another way, all of your Arduino (.ino) code gets transformed into a C++ (ie .cpp) file and then gets compiled with AVR GCC.

The easiest way to move to Atmel/Visual Studio is to use Visual Micro. It is a great product, the documentation is good and the transition is almost seamless.

To migrate your code manually you will have to first convert your .ino file into a .cpp file (see). All of the raw libraries can be found in the Arduino instalation folder. My files were located at C:\Program Files (x86)\arduino-x.x.x\hardware\arduino\cores\arduino\. Any other external libraries will also need to be moved into your new project folder from C:\Program Files (x86)\arduino-x.x.x\libraries\.

$\endgroup$
3
  • $\begingroup$ This is great as a quick and easy solution . Will this work for vs 2010 'll try this out . $\endgroup$
    – Kaviranga
    Commented Nov 1, 2016 at 10:31
  • $\begingroup$ If you are referring to Visual Micro, it is best that you see the documentation on their website. $\endgroup$
    – sa_leinad
    Commented Nov 1, 2016 at 13:18
  • $\begingroup$ Ok .Your answer is very informative.I'll use it asap !. $\endgroup$
    – Kaviranga
    Commented Nov 2, 2016 at 2:41

Your Answer

By clicking “Post Your Answer”, you agree to our terms of service and acknowledge you have read our privacy policy.

Not the answer you're looking for? Browse other questions tagged or ask your own question.