6
$\begingroup$

I am working right now with Arduino UNO and HC-05 bluetooth module.I followed the instruction given on this link for wiring. So there are 2 mode of working with this HC-05 module

  1. Simple serial communication
  2. Working in AT command mode so as to change the parameters of HC-05 module

As long as I work in simple serial communication mode, everything works fine but when I tried to change the parameters of module, it didn't work out. For working in At command mode, PIN NO 34 of HC-05 module needs to be high which I had taken care of. Lately I found that in mu module they had knowingly not connected the Berg strip to PIN 34, so I connected the PIN directly, even though I am not able to change the parameters of module and when I write any command on COM port of arduino IDE, I get this response

Enter AT commands:
ERROR:(0)
ÿÿÿÿÿÿÿÿÿÿÿÿÿÿÿÿÿÿÿÿÿÿÿÿÿÿÿÿÿÿÿÿÿÿÿÿÿÿÿõÿýì¢^
ERROR:(0)
ÿÿÿÿÿÿÿÿÿÿÿÿÿÿÿÿÿÿÿÿÿÿÿÿÿÿÿÿÿÿÿÿÿÿÿÿÿÿÿõÿýì¢^
ERROR:(0)
ÿÿÿÿÿÿÿÿÿÿÿÿÿÿÿÿÿÿÿÿÿÿÿÿÿÿÿÿÿÿÿÿÿÿÿÿÿÿÿõÿýì¢^
ERROR:(0)
ÿÿÿÿÿÿÿÿÿÿÿÿÿÿÿÿÿÿÿÿÿÿÿÿÿÿÿÿÿÿÿÿÿÿÿÿÿÿÿõÿýì¢^
ERROR:(0)
ÿÿÿÿÿÿÿÿÿÿÿÿÿÿÿÿÿÿÿÿÿÿÿÿÿÿÿÿÿÿÿÿÿÿÿÿÿÿÿõÿýì¢^
ERROR:(0)
ÿÿÿÿÿÿÿÿÿÿÿÿÿÿÿÿÿÿÿÿÿÿÿÿÿÿÿÿÿÿÿÿÿÿÿÿÿÿÿõÿýì¢^

I think that garbage is due to my code

Here is my code:

#include <SoftwareSerial.h>

SoftwareSerial BTSerial(10, 11); // RX | TX

void setup()
{
  pinMode(9, OUTPUT);  
  digitalWrite(9, HIGH);
  Serial.begin(9600);
  Serial.println("Enter AT commands:");
  BTSerial.begin(38400);  
}

void loop()
{
  uint8_t x;
  char CommandFromSerial[50]=" ";
  char ResponseFromBluetooth[50]= " ";

  if ((Serial.available())){
    if(Serial.available()>0){
      for(x=0;x<50;x++)
        CommandFromSerial[x]=Serial.read();
      BTSerial.println(CommandFromSerial);
    }
  }

  if ((BTSerial.available())){
    if(BTSerial.available()>0)
      for(x=0;x<50;x++)
        ResponseFromBluetooth[x]=BTSerial.read();
    Serial.println(ResponseFromBluetooth);
  }
}

I am not able to figure out what I am doing wrong. I used this command on COM port AT\r\n and many other commands but every time I get the same response.

Did I mess up with my bluetooth module unknowingly?
$\endgroup$
4
  • 1
    $\begingroup$ I properly indented your code based on the braces. Since the original indentation was quite backwards, please take a look to see if things are correct and the way you intended. $\endgroup$
    – Shahbaz
    Commented Nov 12, 2013 at 15:20
  • $\begingroup$ I'm suspicious of the SoftwareSerial header. Are you able to COM port directly to the BT device, and what kind of responses do you get then? $\endgroup$
    – emc
    Commented Jun 7, 2014 at 18:27
  • $\begingroup$ I used the code and the connection diagram by imjosh on Arduino Uno, and I communicate with the module, but still cannot change Baudrate (error (0)). Something is out of controll still; please share if you find something. I paste the seral output for clarity: at OK at+version +VERSION:2.0-20100601 OK at+baud ERROR:(0) AT+BAUD8 ERROR:(0) $\endgroup$
    – user7021
    Commented Sep 2, 2014 at 12:00
  • $\begingroup$ error(0) is usually associated with wrong commands $\endgroup$
    – user13464
    Commented Apr 17, 2016 at 11:54

7 Answers 7

2
$\begingroup$

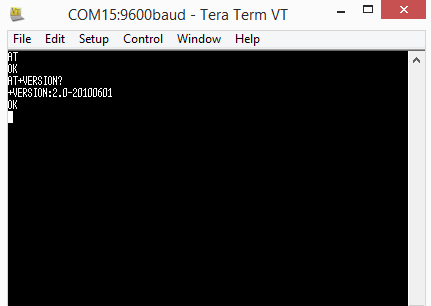
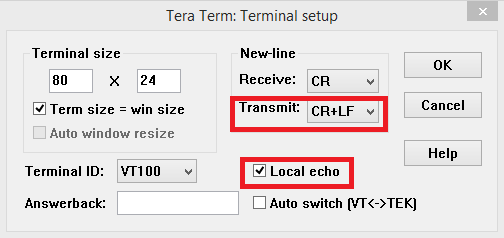
I was having the same problem. I finally solved the problem. This document says that you have to put CR LF (\r\n) characters after you send something in AT mode. But in the arduino code that you use, uses the Serial.write command to send command. But Serial.write command doesn't put CR LF characters. So I used Tera Term to send command. First connect PIN34 to 3.3V. Power the arduino and upload the code below. Open Tera Term. Start a new serial connection. Choose your arduino's serial port. And then click Setup>Terminal. Change Transmit to CR+LF and check Local Echo checkbox. Now you can send the AT commands.

enter image description here

enter image description here

#include <SoftwareSerial.h>

SoftwareSerial BTSerial(2, 3); // RX | TX

void setup()
{
  pinMode(9, OUTPUT);  // this pin will pull the HC-05 pin 34 (key pin) HIGH to switch module to AT mode
  digitalWrite(9, HIGH);
  Serial.begin(9600);
  Serial.println("Enter AT commands:");
  BTSerial.begin(38400);  // HC-05 default speed in AT command more
}

void loop()
{

  // Keep reading from HC-05 and send to Arduino Serial Monitor
  if (BTSerial.available())
    Serial.write(BTSerial.read());

  // Keep reading from Arduino Serial Monitor and send to HC-05
  if (Serial.available())
    BTSerial.write(Serial.read());
}
$\endgroup$
1
$\begingroup$

Wouldn't have thought you have messed up your bluetooth module or it's a problem with your code; it could be the firmware loaded on the module.

I too have encountered problems getting those HC-05 "linvor" modules to respond to AT command set. If the only AT commands that module responds to is AT and setting the name; then you have a slave module. These have been loaded with limited firmware which doesn't respond to other AT commands given.
You need the ones which are master's as they will respond to the other AT commands and have better firmware installed on them.

Found this out by trial and error as I have 2 modules which I was trying to configure so they paired up without user intervention and failing. I bought my modules on eBay from a seller with a ID for emailforyou which gave good information within the description; which informed me that in order to get each module to pair up you need a master & slave. I bought 2 surface mount masters but also opted to get a 6 pin (assembled) HC-06 Master/Slave module as well from the above seller.
Updated

#include <SoftwareSerial.h>

SoftwareSerial BTSerial(16, 17); // RX | TX

void setup()
{
  pinMode(11, OUTPUT);  // this pin will pull the HC-05 pin 34 (key pin) HIGH to switch module to AT mode
  digitalWrite(11, HIGH);
  Serial.begin(9600);
  Serial.println("Enter AT commands:");
  BTSerial.begin(9600);  // HC-05 default speed in AT command more
                         // was 38400 but changed it to 9600
}

void loop()
{

  // Keep reading from HC-05 and send to Arduino Serial Monitor
  if (BTSerial.available())
    Serial.write(BTSerial.read());

  // Keep reading from Arduino Serial Monitor and send to HC-05
  if (Serial.available())
    BTSerial.write(Serial.read());
}
$\endgroup$
10
  • $\begingroup$ That's good information.SO that means in order to change some of the parameters of Module i need to have a module which is master and then only i can change the name and pairing password of the module.Well is HC- also come with master firmware?Also i found out one thing that RX/TX pin of HC-05 moudle i have accpet 3.3 volt and RX/Tx pins of Arduino have some what 5 volts.So i think i need to give a shot to using a voltage divider also and let see if anything happens.Wil upadte further $\endgroup$
    – shailendra
    Commented Nov 13, 2013 at 10:07
  • $\begingroup$ That's correct about being 3.3v as the assembled complete modules have a 3.3v voltage regulator so only respond to a 5V input. There is HC-05 master module which looks the same as a slave. The seller mentioned above uses a white mark to tell which is which. $\endgroup$
    – OricTosh
    Commented Nov 13, 2013 at 10:26
  • $\begingroup$ Yes but if the complete assembled module has on-board 3.3 V regulator then.As i see on the back of module, it's clearly written on RX/TX pins 3.3 V , so i will try to use a voltage regulator and see if that work out because as of now, i am able to get in At command mode but i am getting response as ERROR : (0) which is wrong AT command error response code.So there may be possibility that 5V of RX/TX of Arduino is playing game and messing up with the command being send from Arduino $\endgroup$
    – shailendra
    Commented Nov 13, 2013 at 10:42
  • $\begingroup$ Looking at your code and the code which worked for me, the garbage could be due incorrect baud rate; The statement BTSerial.begin(38400) should be 9600. Not sure why as it goes against what I have read but gave me a readable response. $\endgroup$
    – OricTosh
    Commented Nov 13, 2013 at 10:52
  • $\begingroup$ Tosh: The baud rate 38400 is default baud rate while working in AT command mode.And i am curious to know that did code worked for you and were you were able to change the parameters of module using serial port of Arduino IDE?I will be glad if you can share some information with me either with screenshots or text output. $\endgroup$
    – shailendra
    Commented Nov 13, 2013 at 10:56
1
$\begingroup$

I had the same problem, so please try this code but with IDE 1.0.0 and baud rate 38400 in serial monitor:

void setup() {
  Serial1.begin(38400);
  Serial.begin(38400);
}

void loop() {
  if(Serial1.available())
  {
    byte a=Serial1.read();
    Serial.write(a);
  }
  if(Serial.available())
  {
    byte a=Serial.read();
    Serial1.write(a);
  }
}
$\endgroup$
1
$\begingroup$

You're getting garbage in because the module is running at 9600 baud. In order for the module to operate at 38400 baud, pin 34 must be set high before the module is powered on. It looks like you are trying to set the pin high in Setup(), but it's already too late by then.

Edit: I see now that he hardwired pin 34 high and he is getting valid data read back from the module. The following fixes still apply if you need a way to ensure the baud rate of the module.

You can fix this in a few ways:

  1. use 9600 baud in your code
  2. wire vcc directly to pin 34 so it's always in 38400 baud mode
  3. change the default uart speed using the AT command that does this (can't remember)
  4. tie the hc-05 reset pin to an Arduino output pin so you can set pin 34 high and then toggle the reset which will ensure the module goes into 38400 mode.

Edit: Assuming you have everything connected properly and the baud rates set correctly, the following code is known to work on the Arduino Uno.

/* Serial Loop */

#include <SoftwareSerial.h>

#define rxPin 8
#define txPin 9

SoftwareSerial mySerial(rxPin, txPin); // RX, TX
char myChar;

void setup() {
  Serial.begin(9600);   
  Serial.println("AT");

  mySerial.begin(38400);
  mySerial.println("AT");
}

void loop() {
  while (mySerial.available()) {
    myChar = mySerial.read();
    Serial.print(myChar);
  }

  while (Serial.available()) {
    myChar = Serial.read();
    Serial.print(myChar); //echo
    mySerial.print(myChar);
  }
}

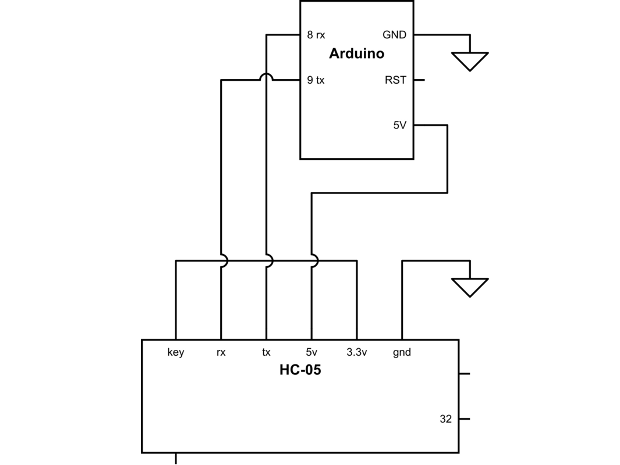
Here is the circuit that goes with the code. The pin labled "Key" is pin 34. Bluetooth command loop schematic

$\endgroup$
4
  • $\begingroup$ Take another look at his code - the 9600 baud hardware serial port is only being used to communicate with (probably) his computer, not the BT device. The Bluetooth is being run via software serial on non-hardware-serial pins at 38400. As long as Serial(9600) commands are brought in completely before writing out to BT at 38400, this shouldn't be a problem. $\endgroup$
    – emc
    Commented Jun 7, 2014 at 18:25
  • $\begingroup$ Assuming the BT device is running at 38400, you are right. I was thinking it wasn't, but now I see that he was at least reading in properly as evidence by the "ERROR(0)" printing out and that he did hardwire pin 34 high. Something is either wrong with the TX signal, or the code. $\endgroup$
    – imjosh
    Commented Jun 9, 2014 at 19:42
  • $\begingroup$ I think that the HC-05 connects on 38400 by default, but it is quite possible that he could have changed the config. I too am suspicious of the SoftwareSerial.h comms. $\endgroup$
    – emc
    Commented Jun 9, 2014 at 23:07
  • $\begingroup$ The baud rate is guaranteed to be 38400 if pin 34 is high at power up. If pin 34 is low at power up, it will go to 9600 by default, or a different rate if the uart setting has been changed. See this document starting at the bottom of page one: instructables.com/files/orig/FOR/4FP2/HKZAVRT6/… - SoftwareSerial works just fine at lowish baud rates (9600). It can work fairly reliably at 38400 as long as the connections are good and wires not too long. At higher rates you might start getting dropped data or errors. $\endgroup$
    – imjosh
    Commented Jun 10, 2014 at 15:16
1
$\begingroup$

I had problems with this as well using a Pro Micro. Testing with a Mega instead and it worked no problem, using (57600) for Serial and (38400) for Serial1. I did try Serial1 as well as BTSerial with the Pro Micro, to no avail but didn't test with BTSerial on the Mega.

There's no pin 11 on the Pro Micro, so I used

SoftwareSerial BTSerial(10, 14);

For whatever reason, after trying with the Mega, it now works with the Pro Micro using John's code above, which is pretty much the same as the code I originally used (and which worked on the Mega).

I have found that Serial.println commands in the "void setup" section don't work on the Pro Micro but do on the Mega, so don't think it's not working just because you don't see those in Serial Monitor. In the "void loop" section they work fine though. It didn't make any difference using a command to wait for Serial to be ready, like so:

   Serial.begin(57600);
   while (!Serial) {
     ; // wait for serial port to connect. Needed for Leonardo only
   }

   Serial.println("Goodnight moon!");

   // set the data rate for the SoftwareSerial port
   Serial1.begin(38400);
   Serial.println("Ready");
}
$\endgroup$
0
$\begingroup$

IN CASE OF A HC05 MODULE : You could use Arduino IDE but don't forget to select "both, NL and CR" in the case nearby the baudrate selection (in the hardware serial monitor).

IN CASE OF A HC06 MODULE: choose "no line ending"

;)

With this code it is ok:

    #include <SoftwareSerial.h>

SoftwareSerial BTSerial(10, 11); // RX | TX

void setup()
{
  pinMode(9, OUTPUT);  //HC-05 pin 34 (key pin) 
  digitalWrite(9, HIGH);  // 5V sur Key pour activer le mode commande AT
  Serial.begin(9600);
  Serial.println("AT commandes:");
  BTSerial.begin(38400);  // HC-05 vitesse par défaut pour la commande AT
}

void loop()
{
  // lecture des commandes AT par le serial port(9600)
  if (BTSerial.available()) Serial.write(BTSerial.read());

  // envoie à HC-05 de commandes AT saisi
  if (Serial.available()) BTSerial.write(Serial.read());
}
$\endgroup$
0
$\begingroup$

https://juangiraldo0.blogspot.com/2018/07/configuracion-modulo-bluetooth-hc-06.html

Probably your error(0) is due to versión firmware problem version 3.0-20170609 have AT comands differents

$\endgroup$

Your Answer

By clicking “Post Your Answer”, you agree to our terms of service and acknowledge you have read our privacy policy.

Not the answer you're looking for? Browse other questions tagged or ask your own question.